用Python在树莓派中使用MCP23017 I/O扩展模块
摘自老外一段话,本来想翻译,有点拗口,直接搬运过来,作为背景:
For all of my projects I have used the standard GPIO header pins as inputs and outputs. This gives you a total of 17 pins to play with but what if you need more?
The easiest way of getting more inputs and outputs is to use an “i/o port expander”. This is a device that allows you to control a number of ports using data you send to the device.
MCP23017 Example CircuitOther people have has lots of success using I2C devices so I decided to give one a try. I2C is a serial communications protocol which allows chips to swap data on the same “bus”. A port expander takes the data and controls the appropriate pins. This allows lots of sensors and devices to be controlled using only a few of the Pi’s GPIO pins.
1. 说说硬件
我买的是微雪电子上的MCP23017 I/O扩展模块,这是一款基于 I2C 接口控制的 I/O 扩展模块,可外扩 16Pin I/O 口,支持同时使用多达 8 个,即可扩至 128Pin I/O 口,兼容 3.3V 和 5V 电平。
产品参数与接线这里不多说,参考该产品的用户手册,当然我们要验证这个拓展模块有没有用的直接表现就是简单地在电路上面接一个小灯(假设接在引脚PAO上).
这个模块不仅可以拓展树莓派,还可以拓展Arduino与单片机,算是通用的,性价比不错.
2. 系统设置与硬件测试
我们先要打开树莓派上的I2C接口,默认是不开的,这个简单,直接在配置里面打开接口就行,然后重启
安装 i2c-tools 工具对器件地址进行确认
sudo apt-get install i2c-tools查询已连接的 I2C 设备
i2cdetect -y 1
将会打印出已连接设备的 I2C 器件地址信息:
1 | |
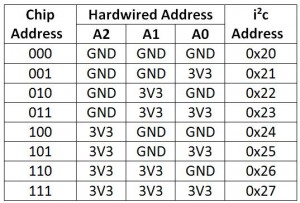
注意,这里不同厂家的拓展模块有可能是其他地址,比如0x20,原因在于我这个模块的A0,A1,A2在厂家出厂时就在内部接了3.3V,所以是0x27,这也是为什么能同时接八个该拓展模块的原因,A0,A1,A2,有接GND与3V3的选择,共有
2*2*2=8不同的组合,具体可以看下面的表格
3.命令行测试
这里的命令行测试我并不是很懂,只是看到外文教程上以这样为例,而且我依葫芦画瓢成功了,写在这里只是为了快速测试 (LED引脚需接在PAO上)
首先我们将PA0-PA6设置为输出模式,将PA7设置为输入(二进制用10000000表示,十六进制用0x80表示):
sudo i2cset -y 1 0x27 0x00 0x80将PA0设置为逻辑高点亮LED:
sudo i2cset -y 1 0x27 0x14 0x01关闭小灯则可以用:
sudo i2cset -y 1 0x27 0x14 0x00
4. 在Python脚本中使用拓展模块
习惯了在树莓派中用gpiozero简单丝滑流畅地操控IO,不用关乎太多底层,实在爽的很. 而在这里,我们是I2C bus协议,我们一般是用到smbus库,但是还是有些底层(特别是拓展模块上各个引脚代表的寄存器地址好像有点难以理解)的有些费力,所以找阿找,找到了一个新库,依旧保持优雅!
4.1 什么是CircuitPython?
CircuitPython基于Python,在Python上添加了硬件支持.CircuitPython旨在在微控制器板上运行。微控制器板是一块带有微控制器芯片的电路板,它本质上是一个多功能的一体机。你持有的电路板是微控制器板! CircuitPython可以在小型Linux板上运行,这里正好可以用我们的树莓派试试手.先安装库sudo pip3 install adafruit-circuitpython-mcp230xx,然后是代码演示。
4.2 代码演示
1 | |
具体的代码解释都在注释上写这个了,很简单,不展开.想要查看更多的例子或者源代码可以看官方库手册
5. 总结
当树莓派GPIO口要连接较多设备,数量紧张时,可以用MCP23017拓展模块了来增加,最多可以加128个….adafruit_mcp230xx.mcp23017库也可以很Python地写出控制代码,但是一些监听事件要自己实现,不像gpiozero都有现成的轮子.当然我们可以转换下思路,把一些简单的output设备接在拓展模块上用来简单控制就行,把一些实现复杂的input设备接在树莓派自带的GPIO上,就可以用gpiozero库的高级内容了.
一些资料整理:
How To Use A MCP23017 I2C Port Expander With The Raspberry Pi – Part 1
Using MCP23008 & MCP23017 with CircuitPython
Using the MCP23017 port expander with WiringPi2 to give you 16 new GPIO ports – part 3
本博客所有文章除特别声明外,均采用 CC BY-SA 3.0协议 。转载请注明出处!